
If you are starting your career in the NHS in the UK, you will most certainly end up doing IV cannula insertion.
While some are naturally good with the correct technique, others (such as me) struggle to find answers to questions such as the proper size or the right colour.
In this guide, I will break down everything you need to know about IV cannulas: what they are, how they work, which size and colour to choose, and how to insert them properly.
Whether you’re preparing for PLAB, OSCEs, or working in the NHS, this guide is for you.
What is an IV Cannula?
A tiny, flexible plastic tube containing a needle for guidance is called an IV cannula. Usually performed in the hand or arm, it offers intravenous access into a peripheral vein. IV cannulas assist in various medical procedures by providing reliable venous access.
Repeated injections are not necessary once the cannula is in place because it remains there for a few days. Doctors or trained healthcare professionals typically insert IV cannulas.

Peripheral IV catheters are inserted into small peripheral veins for administering intravenous fluids and medications.
Common Uses of IV Cannulas
Cannulas can be used for both infusion therapy and for providing access for treatments and diagnostics. These include:
- IV fluid resuscitation
- IV medication administration
- Transfusion of blood or blood products (FFP, platelets, PRBCs), Obtaining blood samples
- Transfusion of whole blood or blood products (FFP, platelets, PRBCs)
- Contrast administration for CT/MRI scans
- Chemotherapy (temporarily)
- Administration of large volumes of fluids, such as in total parenteral nutrition or rapid resuscitation
- Emergency drug delivery in critical conditions like sepsis, DVT, or arrhythmias
Types of Cannulas
Cannulas are versatile medical devices designed to deliver medications, intravenous (IV) fluids, and blood products directly into the body.
They come in various sizes and types to suit different clinical needs and patient populations. The most commonly used cannulas in healthcare include:
- Intravenous (IV) Cannulas: These are the standard devices for intravenous cannulation, allowing for the administration of IV fluids, medications, and blood products directly into a peripheral vein. IV cannulas are available in various sizes and lengths to accommodate different procedures, patient ages, and vein conditions. They are essential for infusion therapy, blood sampling, and the delivery of blood components during treatment.
- Nasal Cannulas: Unlike IV cannulas, nasal cannulas are used to provide supplemental oxygen through the nostrils. They are commonly used in patients who require respiratory support but do not need invasive procedures. Nasal cannulas are lightweight, flexible, and suitable for both adults and infants.
- Arterial Cannulas: These are specialised catheters inserted into an artery, primarily for continuous blood pressure monitoring and frequent blood sampling. Arterial cannulas are crucial in critical care settings and during high-risk surgery, where accurate monitoring of blood gases and pressure is required.
Each type of cannula is designed with specific characteristics—such as gauge, length, and material—to match the needs of different procedures and patient groups.
Whether used for peripheral venous catheters, infusion therapy, or blood sampling, selecting the right cannula ensures safe and effective access for fluids, medications, and blood products.
IV Cannula Sizes and Colour Coding
Cannulas are colour-coded for easy identification and come in a variety of sizes. What you’re giving and the state of the patient’s veins will determine the size you select.
Mnemonic to Remember

Interpretation
Imagine a child wearing a Pink Tee and Blue jeans, holding an Indian flag. He is also wearing yellow socks and purple shoes. (Oddly fashioned kid these days)
Cannulas are categorised based on size and flow rate, with each size distinguished by a specific colour.
| Colour | Gauge | Flow Rate (mL/min) | Typical Use |
|---|---|---|---|
| Orange | 14G | 240 | Major trauma, rapid fluid or blood resuscitation |
| Grey | 16G | 180 | Surgery, trauma, rapid fluids |
| Green | 18G | 90 | Blood transfusions, rapid fluid replacement |
| Pink | 20G | 60 | Neonates, infants, and frail patients |
| Blue | 22G | 36 | Elderly, paediatrics, smaller veins |
| Yellow | 24G | 20 | Neonates, infants, frail patients |
| Purple | 26G | 13 | Premature neonates (rarely used) |
- Pink = 20G, Blue = 22G, Yellow = 24G, Purple = 26G (used in paediatrics and neonates)
- The purple gauge (26G) is a specialised cannula designed for delicate veins in premature neonates and is used when a very low flow rate is required.
- Mastering this skill is crucial if you have done ALS and are likely to end up in a MET call.
Choosing the Right Size
- Emergency/trauma: Orange (14G) or Grey (16G)
- Routine medications: Pink (20G)
- Older patients/small veins: Blue (22G) or Yellow (24G)
- Paediatrics/Neonates: Yellow (24G), Purple (26G)
- Blood transfusions: Minimum Green (18G), preferably Pink (20G)
Key Parts of an IV Cannula
A standard IV cannula contains:
- Catheter – The flexible tube that remains in the vein
- Needle – Sharp metal introducer for vein puncture
- Bushing – Supports the needle–catheter assembly inside the housing
- Valve – Prevents backflow and leakage of blood or fluid
- Port Cap – Seals the injection port when not in use
- Needle Grip – For controlled handling during insertion
- Wings – Aid in securing the cannula to the skin with tape
- Luer Connector – Standardised connection for extension sets or syringes
- Flashback Chamber – Confirms venous access by showing a flash of blood
- Luer Lock Plug – Ensures a secure seal when not in use

Extension tubing can be attached to the cannula for easier medication or fluid delivery. It is important to ensure a secure connection between the cannula and any attached devices or tubing to prevent leaks or dislodgement.
On the other hand, the Three-Way Cannula has different parts named. These are as follows:
- Male Luer Lock part
- Three-Way Stop Cock (made of medical-grade PVC and 360-degree smooth tap rotation) (Arrows on the top indicate the direction of the flow)
- Two Female Luer Lock parts
IV Cannula Insertion Procedure
The following equipment should be ready in a kidney tray before starting:
| Item | Purpose |
|---|---|
| Non-sterile gloves | To maintain standard infection control |
| IV cannula (correct gauge/size) | Choose based on purpose and patient vein |
| Tourniquet | Helps engorge veins for easier identification |
| Antiseptic wipe (alcohol or chlorhexidine) | Cleans the insertion site; avoid contact with sterile surfaces to maintain asepsis |
| Saline flush (10 mL) | To confirm patency after insertion |
| Syringe | Optional — for drawing blood during insertion |
| Sterile gauze or cotton wool | Used to stop bleeding post-insertion |
| IV dressing (transparent or adhesive tape) | Secures the cannula in place |
| Sharps disposal bin | Used needles must be properly disposed of immediately after use to prevent health risks |
| Clinical waste bin | For gloves, packaging, and disposables |
| Documentation chart/sticker | For cannula size, site, date/time of insertion |
How to Insert an IV Cannula in 10 Steps (Step-by-Step)
1. Prepare
Wash your hands, wear gloves, and gather all the equipment in a kidney tray (cannula, plaster, tourniquet, saline flush, alcohol swab).
2. Explain and gain consent
Introduce yourself to the patient, explain the cannulation procedure, and obtain verbal consent. If the patient lacks mental capacity, an MCA should be completed.
The insertion of peripheral venous catheters should ideally be performed by accredited medical personnel.
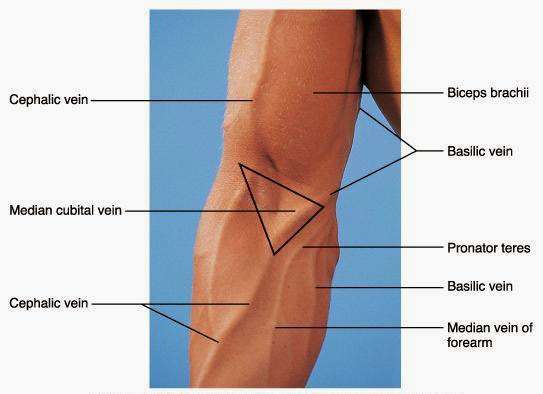
3. Identify the vein
Prefer the median cubital, cephalic, or metacarpal veins. Veins over the dorsum of the hand should be treated with caution to avoid complications such as arterial cannulation or injury. Try to avoid joints, as you can damage the nerves.
4. Apply a tourniquet
It should be tight enough, but should not be uncomfortable for the patient.
5. Clean site
Use alcohol or chlorhexidine. Let it dry. Asepsis is crucial to prevent contamination of living tissues during IV cannulation.
6. Warn the patient
Make sure you say “sharp scratch” to inform the patient before pushing the needle.
7. Insert cannula
Bevel facing up, at a 15-30 degree angle. Look for flashback.
8. Advance catheter
Start sliding the cannula forward while withdrawing the needle partially backwards. Aim to push the plastic part inside and pull out the metal part.
9. Secure and flush
Once the cannula is in place and stable, secure it by applying a dressing, flushing with saline to check patency and labelling it correctly with the date of insertion.
10. Dispose safely
Sharps go immediately into the bin. Document the procedure. Wash hands, wear gloves, and gather equipment (cannula, plaster, tourniquet, saline flush, alcohol swab).
Common Vein Sites for IV Cannula Insertion: Pros and Cons
| Vein | Pros | Cons |
| Cephalic | Large, secure, good for blood products | May mimic radial artery, hard to access |
| Basilic | Often overlooked, large | Rolls easily, awkward positioning |
| Median Cubital | First choice in emergencies, easy to access | Uncomfortable, risk of artery cannulation |
| Metacarpal | Visible, stable in theatre, accessible | Positional flow, easy to dislodge, poor dressing adherence |
Finding suitable veins requires a systematic approach and observation of the patient’s anatomy.
Common veins selected by medical professionals include:
1. Cephalic Vein
Advantages:
- Relatively larger and can be best suited for blood transfusions
- Dressings can easily secure it
- Splinted by the forearm bones, reducing movement
Disadvantages:
- Difficult to access compared to the metacarpal veins
- May be mistaken for an aberrant radial artery
2. Basilic Vein
Advantages:
- Large vein frequently missed on initial inspection
- Useful when limited options are available
Disadvantages:
- Requires awkward arm positioning
- Tends to roll away during cannulation
- Higher risk of phlebitis
- Cannula port may catch on bedding
3. Median Cubital Vein
Advantages:
- Stable, big vein that can accommodate larger cannulas
- Sustains better flow in conditions of low perfusion
- First option in an emergency
Disadvantages:
- Positional problems brought on by flexion and extension of the elbow
- Likely to cause the patient discomfort
- Danger of unintentional cannulation of the brachial arteries
4. Metacarpal Veins
Advantages:
- Easily perceptible and tangible
- Metacarpal bones splinted
- Preserves proximal veins for later use.
- Best location for access during surgery or theatre
Disadvantages:
- Mobility can lead to dislodgement
- Frequent hand washing may cause the dressing to loosen
- Elderly people with delicate skin often struggle with cannulation
- Depending on wrist movement, flow may change (i.e. positional venflon)
Contraindications to Peripheral IV Cannula Insertion
No absolute contraindications for IV cannulation exist, but peripheral venous access should be avoided in injured or infected extremities.
Other contraindications include:
- Limb with AV fistula or post-mastectomy
- Site with existing phlebitis
- If central access is safer (e.g. vasopressors, chemo)
Some points in detail:
- Irritant or vesicant drugs: Certain medications, such as chemotherapy, vasopressors, or sclerosing agents, can cause tissue necrosis if they are extravasated. Examples of these include solutions with a pH of less than 5 or greater than 9, or an osmolarity of more than 600 mOsm/L. The optimum way to administer them is by central venous access; in an emergency, a peripheral IV should be used.
- Injured or compromised limbs: Limbs that are burned, infected, traumatised, or have undergone surgery in the past (such as lymph node dissection or an AV fistula) should not be cannulated. If there is another site available, select it.
Common Complications of IV Cannulation
Indeed, IV cannula insertion carries some risks, just like any other medical procedure.
Although it is not 100% safe, knowing the potential risks helps in both early detection and prevention.
- Hematoma: This occurs when vein trauma leads to blood pooling under the skin. This can occur during either insertion or removal. However, using the right vein and applying pressure after removal significantly reduces the risk.
- Infiltration: This means the medication or the fluid administered leaks from the vein and goes into the surrounding tissue. This can be prevented by securing the cannula correctly and looking for any obvious swelling, blanching, or pain.
- Embolism: This is the most dangerous one, as either air, thrombus, or even the catheter fragment entering the venous system can lead to pulmonary embolism. This is fatal and should always be avoided. De-airing the syringe and avoiding re-insertion of the needle into the cannula can help prevent this. Whenever possible, use the smallest gauge to minimise risk.
- Phlebitis: Complications of IV cannulation include phlebitis and sepsis. Phlebitis is the most common complication where veins become inflamed due to mechanical trauma, chemical irritants or infection. It is recommended to rotate sites regularly, choose an appropriate cannula size and location, and monitor the infusion type.
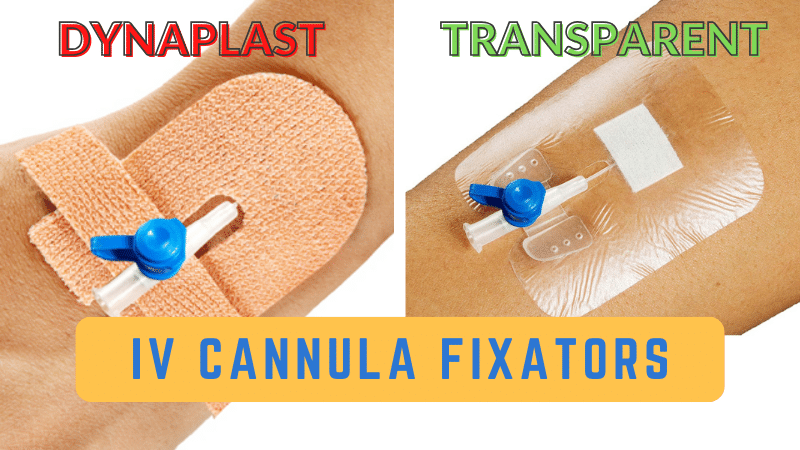
Fixators and Dressings
To secure the cannula:
- Transparent film: Allows inspection, good adherence
- Elastic tape (Dynaplast-style): Strong hold, flexible
Importance of Proper Care
Proper care and maintenance of cannulas are vital for minimising risks and ensuring the safe administration of IV fluids, medications, and blood products. Attention to detail at every step—from insertion to removal—helps prevent complications such as phlebitis, infection, and trauma at the insertion site.
Key aspects of proper cannula care include:
- Verification and Secure Placement: Always verify that the cannula is correctly positioned and securely fixed at the insertion site. This reduces the risk of dislodgement and ensures reliable access for IV therapy.
- Aseptic Technique: Using the correct technique during insertion and removal, including hand hygiene and local anaesthesia when needed, helps prevent infection and trauma to the skin and vein.
- Regular Flushing: Flushing the cannula with saline at regular intervals prevents blockages and maintains patency, which is especially important for patients receiving total parenteral nutrition, chemotherapy, or large volumes of IV fluids.
- Monitoring and Review: Regularly inspect the insertion site for signs of swelling, redness, or pain, and review the need for the cannula. Early detection of complications allows for prompt intervention and reduces the risk of more serious issues.
- Safe Disposal: Properly dispose of used cannulas and needles in designated sharps containers to prevent injury and cross-infection.
Special care is required for high-risk groups, such as elderly patients, neonates, and those undergoing high-risk surgery, as they are more susceptible to complications. By following best practices for cannula care, healthcare professionals can ensure safe administration of fluids, medications, and blood products, and provide optimal support for patients requiring parenteral nutrition or complex infusion therapy. Regular review and verification of care procedures help maintain high standards and improve patient outcomes.
Tips for Smooth Cannulation
- Start distal (hands), then move proximally if needed
- Warm the limb to dilate the veins
- Avoid areas over joints and bony prominences
- Never reinsert the needle into the catheter
- Stop immediately if pain or resistance occurs when flushing
Veins with high internal pressure are easier to access and can be facilitated by techniques like using a tourniquet.
Final Thoughts
Learning to use an IV cannula correctly is essential for safe patient care. Whether you’re inserting one during a calm ward round or in an emergency resus bay, knowing your sizes, veins, and technique makes all the difference.
The no-touch technique minimises the risk of contamination of sterile equipment during IV procedures.
Frequently Asked Questions
How long can you leave an IV cannula in?
Most guidelines recommend removing or changing a cannula every 72–96 hours, or sooner if complications occur. The likelihood of phlebitis and sepsis due to IV cannulas can be reduced by replacing the cannula every 48-72 hours.
How to insert an IV cannula step by step?
Follow these steps: prepare equipment, identify a vein, apply a tourniquet, clean the skin, insert the cannula (bevel up), check for flashback, advance, flush, and secure.
Which size IV cannula is used for adults?
Pink (20G) and Green (18G) are most commonly used for adult patients.
How to check cannula size?
Cannula size is printed on the packaging and identified by colour code.
Which cannula is bigger, blue or pink?
Pink (20G) is larger than Blue (22G). A smaller gauge number means a larger cannula.
What is the best site for a cannula?
Because of its size and accessibility, the median cubital vein is frequently chosen, particularly in emergency situations.
Is putting a cannula painful?
Most patients feel a sharp scratch. Discomfort is usually brief if done correctly.
What is the difference between a cannula and a catheter?
A cannula is a type of catheter. The term “cannula” generally refers to the entire device, including the catheter and needle.

